Camera Display Part 1

I began the chalkboard paint and display project!  Hurray!  The great news is that the Martha Stewart How-to about making chalkboard paint in any color really works well!

I started off just trying to figure out how to organize the cameras.  I could comfortably fit four of the cameras in this smaller shelf.  The good news is that it is pretty lightweight.
 Apologize for the incredibly horrible pictures.  Not only have I been taking pictures at night, but now I'm taking night pictures from a CELL PHONE.  Blah.

First, a bit about the cameras.
The oldest is in the upper left corner:  a Rolleiflex T1 made from 1958-1966
The upper right corner is a Kodak Brownie Bullet made from 1957-1964
The lower left corner is a Kodak Instamatic X-15 made from 1970-1976
The lower right corner is a Kodak Instamatic 404 made from 1965-1969
 Then I wanted to put a whole roll of the other cameras on a shelf beside the smaller shelf above.  However, I hit a snag.  This often happens, and I believe it is from the paneling having more give than drywall woodwould.  I'll give you the details on these cameras once I put them on display (and do the research).

You can see above where the shelf was going to rest and the shelf is leaning against the wall next to the level.  But it was just too dang wobbly.  I had to nix this idea.  See the video for a real demo of the wobbly nature of the shelf.  I couldn't put a bunch of vintage and expensive cameras perched on a wobbly shelf.  I just couldn't.


Then, after I decided the arrangement of the first set of cameras, I mixed a batch of custom chalkboard paint.  The color below is the same as the living room color.  See, it isn't neon blue!  This is almost an exact replicate of the real color the room looks.  It is like the deep sea.
 All you do is mix 1 cup of paint with 2 tablespoons of unsanded grout (I got my grout in the clearance aisle at Home Depot).  Mix well, and you're ready to go.
 One coat....

 Three coats with the cameras:
 And some information about the camera manufacture years (I'll have to jazz up the handwriting later...when I'm not so tired)....

Pig Show and Shoes

We didn't do much this weekend to do house updates.  Instead, we went to a pig show at the regional youth fair:
 I like to go because the judge explains how he tells which pig is better than the others (they all look the same to me..), and it makes me feel like the Pioneer Woman.  They like to mention how good the pig will "hang an acceptable carcass".  That has to be my favorite line.
 Millie was shy around the cows at first, but after a while, she got very into visiting with them.


 And eating a push pop will always make a toddler happy....

 After we got home, I finished sewing another shoe order for my etsy shop.  I do love making these cute little shoes.  They all come out looking so cutesy!


Curtains, again

Well, I got the navy blue curtains I ordered in the mail.  They are too dark.
 The color on this isn't quite true...it makes our walls look almost neon blue.  They are DARK!!  And the curtains are darker.

Quite, quite navy, but too dark.  So I have to return them.  On with the curtain hunt, I say.  So I checked Overstock.com again....and they are having another home sale.  Looked through exactly ONE page of curtains (I looked through over 300 before, on this site alone)...and found the jackpot!
Yes!  Chocolate, wheat, and green, the accent color in the living room!  Hallelujah!  Best part was they are $30 cheaper than the first set I bought.  I'm getting 8 panels for $108.  That is a dream.  They are also lined, while the navy set are not lined.  I'm excited to try these.  AND, I have the lamp in that picture :)

My paternal grandfather was an amateur photographer.  And I have a lot of his old equipment.  My maternal grandfather happened to keep most of his personal cameras and when he died, my sisters and I divided the cameras among us.  Until now they have been in boxes, sitting on the floor of my master bedroom, or just sitting in their bags in the sewing room.  But not any more.  I want to display them in our living room so everyone can enjoy them.

And it all came together when I came across this wonderful idea on pinterest:

Pinterest

I'm pretty sure I have two shelves worth, so I got a basic open shelf at Home Depot, in brown:
and I also picked up one shelf at Goodwill:

and one shelf at a garage sale:

Here are all the cameras I have:

I'm hoping that they will work together nicely to provide a place to display the cameras.  I am planning on painting a chalkboard finish to outline the cameras and write their names, and perhaps display some pictures that would have a vintage feel of our family.  My only downside is that I probably will have to sand and paint the garage sale display because some of the plywood laminate is pulling away from the unit.

One other concern is dust.  I was trying to come up with a way to keep this display from getting dusty?  I was contemplating putting anti-glare plexiglass to attach to the front of the cases that are self-contained, but I don't want anything to be in the way of seeing the cameras.  I'm such a bad duster, though.....

After I paint, I'll post an update with the display how I improved the look of the shelves.  Sorry for the bad pictures, I'm a nighttime blogger and home improver.  No pictures are taken in daylight.....

Master Bedroom Redo


Not that I have the living room done, or anything, but I felt like beginning work on our master bedroom.

Right now it looks like a motel room with a lousy ceiling fan we really don't need.  Nice bathroom chandy's, huh?  They aren't even centered on the sink or mirror.  The carpet is still in good shape for the entire house so that is staying, meaning that I really need to stay away from grey and go with a tan scheme and I've already decided I'd love to do green in here.  A nice fresh green to contrast with the deep navy blue on the wall outside this room.  Here is the floorplan now, and what we are shooting for in the future.


The hand-drawn plan above is my hope and aspiration.  For right now, I'm not moving walls, the sink, replacing the shower stall, or anything else.  Here is my list of things to do:
  • Paint the walls
  • Remove the wall paper in the bathroom sink area
  • Remove the ceiling fan and install a light fixture, or a newer fan (husband likes fans)
  • Upgrade endtables to the correct height for our bed (ours are too short)
  • Upgrade lamps on the end tables so we can see to read in bed (perhaps install lamps that attach to the walls beside our bed)
  • Paint one of the dressers in an accent color for some fun
  • Accessorize with a rug
  • Find a bench for the end of our bed to put on shoes
  • Find some interesting art/wall hangings and something to go over the headboard
Here are some of my inspirations for the master bedroom.  First of all, you get to the room through the living room with the dark blue wall and a green accent.  I was hoping to play on the green accent for the two looks to be compatible, but not matching exactly.  So I had the idea of green and gray.  But the carpet is a deep tan and I don't like tan and grey together.  So I'm going to work with more of a spring woodlands feel, with textures, some plants or some dried wreaths, and stick with a green/tan feel.  Here is a picture I love from Country Living magazine:
Pinned Image
And you can tell that would work with a dark brown sleigh bed rather than a cream headboard.  To keep things from getting too heavy, I'll stick with lighter lamp shapes, with some white furniture accents.  The green I'm using is not as spring/apple green, it is more of a sea green, called Martha Stewart Tidewater (same name as the brand of our boat...no kidding).

It does read blue on the screen, but it yields more of a green in person.  I think it will remind me of the coast.  Along with that, I'm contemplating buying a 30" tall nightstand to go on one side of our bed.  I don't like matching nightstands so I'll get a different one for the other side.  Can you believe with a King bed mattress that is 30.5" high, we are using end tables that are only 20" high?  My arm doesn't bend naturally downward like that. 

This one is $199 at Ballard Designs.  I'd use baskets for one of the shelves to put things normally on the top of my nightstand, and use bookends to make one shelf for all my nighttime reading materials.  I read about five books at a time (currently America Aflame [Civil War context], Class of 1846 [generals from West Point in the Civil War], Staying Lost [hiking the Pacific Coast Trail], Easter Rebellion of 1916 [Ireland's rebellion], and Lifeboat by Charlotte Rogan [fiction 1914 boat sinking where people are stuck in a lifeboat]).
I actually REALLY love this chest (I'd get it in white), but it is $549. Anyone see any like it for cheaper?

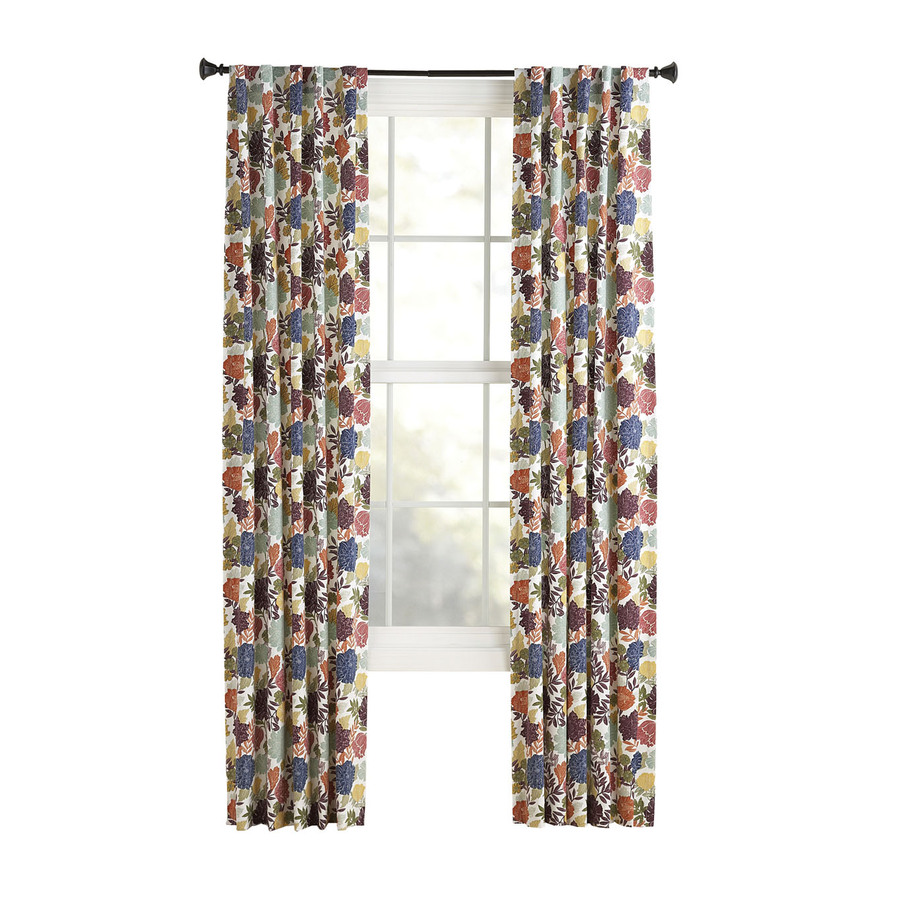
I also need to figure out curtains for the lone window in this room and I'm thinking of using a traveler system, like the rest of the windows in the house, but have the rod extend much past one side of the window so that when you pull the drapes, the window is completely exposed instead of some of it being obscured by the bunched fabric.

Here are some of the curtain choices I'm thinking of:
Target (red accent)
Target (brown accent)
Lowe's (tan accent)
I'm leaning towards the middle or last option.  The last ones are $14.97 per panel and I think I'd at least need 2, but possibly four to give a full feel.  At least I definitely have curtain rods that I love so I don't need to buy those.

At the end of our sleigh bed, I would like a bench to help with putting on shoes...as well as a place to store the 20 pairs of shoes we have laying all over our house.  Anyone else have this problem?  Hint, they aren't my shoes.
Target - $165
Here is another cute bench from Macy's with storage, but it is $399.

Finally: the to-do list:
  • Paint bedroom walls
  • Install floating shelves and put up decorative items on them
  • Get bench or seating for room
  • Remove wallpaper in bathroom sink area
  • Paint bathroom sink area and bathroom
  • Install curtains and new curtain rod
  • Change ceiling fan or get new light fixture
  • Get new nightstands to match the height of our actual bed
  • Sand and paint bookcase
  • Move in bookcase to hold books and personal items
  • Hang art, some pictures, and other stuff for accessories
  • Clean old dresser and buff out scratches, perhaps get new pulls
I did already buff scratches out of a dresser my mom had when she was little, and it does look a tiny bit better.  And I've sanded the bookcase we got at a garage sale for $3.

Laundry Room Update

Oh, our laundry room.  It is fantastic to have one inside, most Floridians are stuck with doing laundry in a steaming garage.  But, it is has NO storage!  We've been living here for 8 months, like this:

 Doesn't it scream, welcome, here's a pile of laundry now get to work?  Plus we have a toddler, and you really musn't leave killer chemicals on the FLOOR!  (I'm ashamed, but working to fix the problem....give me that.)  And here is what you see when you enter....at least I had put the ironing board and iron hanger up, after we had the hanger for 2 months.  The pattern is full of good intentions.

 I hate the stack of towels, but currently I don't have a plan for how to store those.  So expect to see that stack, just the way it is, in the big reveal.  I also have more cleaning supplies than someone who doesn't clean needs.  So I should clean more.  There are more hiding in a hall closet.

Today I had a work foreman give me some helpful hints on how to paint more efficiently.

 First, I painted all the boards that were going up, so I didn't have to try to cut all this in once it was installed.  That is plenty easier than painting later, I assure you.
And here are the other boards.  This project is relatively cheap, including a 10" wide oak board, two 1x4" boards, and them cut to size.  I also needed three closet rod holders, and the closet rod end hardware to attach on either end.  We bought the materials in August 2012.  I count 5 months there.  Argh.
 I marked a level line at the chosen height.  This shelf is very high, but mainly because we are using the closet rod as a way to hang dry clothes that shouldn't go into the dryer.  Then I found the studs and screwed the wood into all three studs.
 Then I cut three shorter pieces of wood that would vertically, where the closet rod holders screw in.  I feel like this is extremely over-engineered, but hey, that's what I do.  I bought four and I would have fit all four in there if we had more studs.  This shelf is never going to fall down.  Then I screwed in the three curtain rod hangers and the side wood pieces, where the curtain rod holders will screw into place.
 Ta-da!!  We chose not to paint the rail, simply because with the hangers sliding around, I don't want the paint to peel away and make a mess.
 I picked up some matching bins at the Dollar Store (can't beat those prices) and although I wish they were a different color, it does make the room a lot more cheerful.
 Here is what it looks like as you walk by.  Phew, that is so much nicer.
What do you think?